AdWords Conversion Optimizer is a feature that automatically enhances some bids based on the historical data within your PPC campaigns. And we love it.
Here’s how it works: Conversion Optimizer chooses a new bid for each auction, with the goal to decrease the cost per acquisition by spending money on the search queries and sites where ads are most likely to convert. It also refines by the user’s operating system, location and more, helping you avoid unprofitable clicks.
The longer your campaign has tracked conversions, the more data that’s available to Conversion Optimizer. That’s why you need at least 15 conversions within the past 30 days in order to enable the feature within your AdWords account. (The introductory video below says 30, but it’s actually 15.)
Now, this feature is not to be confused with enhanced CPC bidding in AdWords. We’ve used that tool before and weren’t too impressed with it. But with Conversion Optimizer on the other hand, we’ve seen a big lift with clients that have implemented this feature and we do recommend giving it a go.
Google says others are experiencing positive results, too. On the feature’s landing page, it says that on average, “campaigns adopting the Conversion Optimizer achieve a 21 percent increase in conversions while decreasing their CPA by 14 percent.”
Here’s a good introduction to how the feature works, then we’ll talk about setting it up:
Enabling Conversion Optimizer on Your Account
First, you need to have a look at your conversions. Google says you need at least 15 in the past month to enable Conversion Optimizer, but here at Group Twenty Seven, we err of the conservative side and start when we have a little more – like 20.
We also look at those conversions on a month-by-month basis prior to making a decision. If you just happen to have a really good month, and 15 or 20 conversions aren’t normal for that campaign, you may not want to turn Conversion Optimizer on just yet. Remember, the optimizer is based on historical data.
So let’s get started with a couple steps to enabling this feature.
1. Choose a Campaign That’s Eligible for Conversion Optimizer
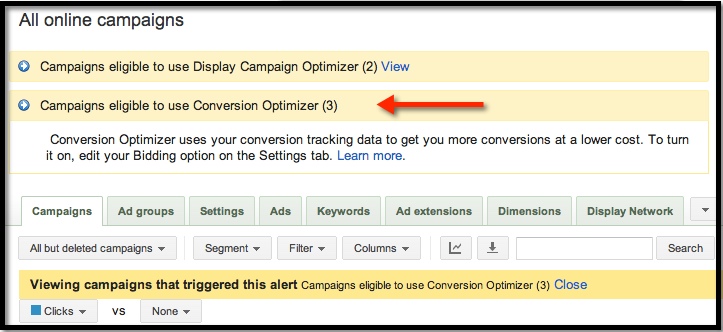
If you have any eligible campaigns, you’ll likely see a note in your AdWords campaigns dashboard like the one in the following screenshot:
Below this message, you’ll see a list of eligible campaigns. Click on the campaign that you want to enable Conversion Optimizer.
2. Go into Settings and Make a Few Adjustments
Before you push the feature live, make sure your mobile bids are set to zero for the eligible campaign. Within your ad scheduling, you’ll also want to switch it to all days and all hours for that campaign.
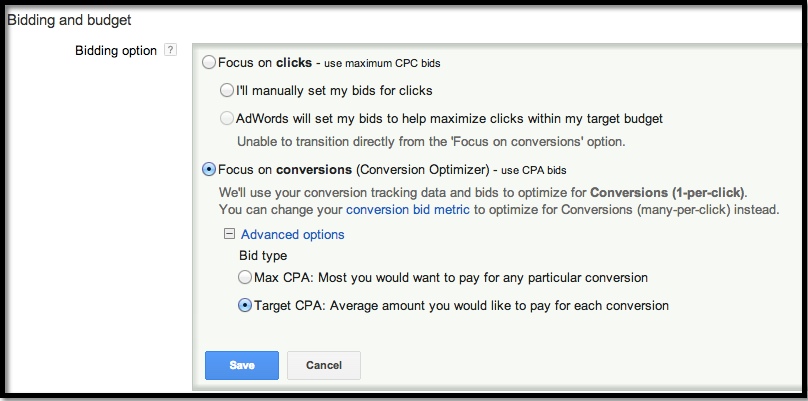
Then, you’ll want to head over to the bidding and budget section. Choose edit, click on: “focus on conversions.”
Go into the advanced options of that section next (see screenshot below). We usually choose the “target CPA” option – this is your target cost per acquisition, which is the average amount you want to pay per conversion.
In the screenshot below, you won’t see the option to set your target CPA, because we’ve already implemented it for this account. But, Google will offer up a suggested target in this step.
Historically, we have gone with what Google recommends here for target CPA, but you’ll want to sanity-check the number before you set it. Look at the past couple month’s worth of data and see what the average CPA was for that campaign.
By completing this step, you’ve enabled Conversion Optimizer. It’s that easy.
3. Check Out The Results
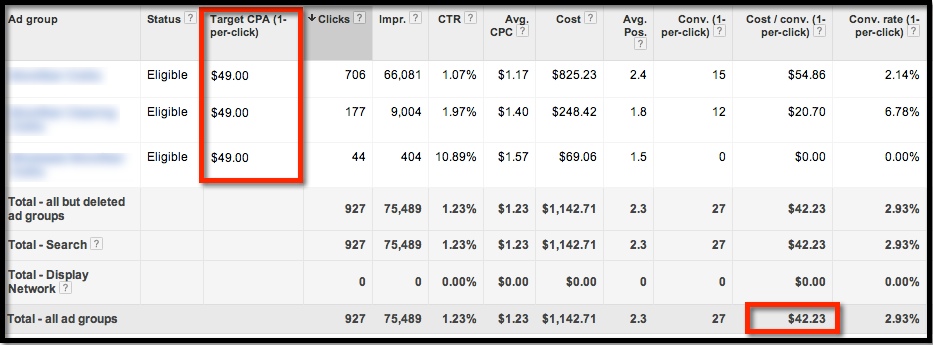
Let’s quickly look at a snapshot of results for one campaign where Google set the target CPA at $49.00. Here, you can see that the CPA has come in at around $42 for this particular campaign.
Conversion Optimizer has done its job, and well – this is less than we’ve paid in the past for conversions in this particular PPC campaign.
All in all, Google AdWords Conversion Optimizer is s simple step that can drive your cost per acquisition down and without much hassle. Check it out, and let us know if you’re seeing the type of success we are.


